ホーム » Linux (ページ 4)
「Linux」カテゴリーアーカイブ
VS 2019 Raspberry Pi への接続で…
VS 2019 の「オプション」-「クロスプラットフォーム」-…-「リモートヘッダー…」の「更新」を選択すると,
エラーが発生しました。Could not connect to the remote system or the connection was lost。詳細については、C:\Users\Iwao\AppData\Local\Temp\vslinux_header_update_log.txt を参照してください。トラブルシューティングについては、https://aka.ms/AA23jat をご覧ください。

SSH コマンドで接続しようとするとやはり接続できない.IP では可能.
Microsoft Windows [Version 10.0.18362.418]
(c) 2019 Microsoft Corporation. All rights reserved.

C:\Users\Iwao>ssh -l pi raspberrypi
ssh: Could not resolve hostname raspberrypi: \202\273\202\314\202\346\202\244\202\310\203z\203X\203g\202\315\225s\226\276\202\305\202\267\201B

C:\Users\Iwao>ssh -l pi 192.168.1.36
pi@192.168.1.36's password:
Linux raspberrypi 4.19.66-v7+ #1253 SMP Thu Aug 15 11:49:46 BST 2019 armv7l

The programs included with the Debian GNU/Linux system are free software;
the exact distribution terms for each program are described in the
individual files in /usr/share/doc/*/copyright.

Debian GNU/Linux comes with ABSOLUTELY NO WARRANTY, to the extent
permitted by applicable law.
Last login: Tue Nov 12 17:04:32 2019

SSH is enabled and the default password for the 'pi' user has not been changed.
This is a security risk - please login as the 'pi' user and type 'passwd' to set a new password.

pi@raspberrypi:~ $
ちょっとわからないので,IP での接続を追加して対応.

Linux から NAS 上のアクセス
Linux から NAS 上のファイルを読み込むコード
Windows からであれば次の様な指定が可能.
tstring test_imo = _T(“//DS116/web/i_Tools/Doc/blog/3D_Data/Test_cube_line.imo”) ;
使用する関数や API によっては “\\” でないとうまくない場合もある.
tstring test_imo = _T(“\\\\DS116\\web\\i_Tools\\Doc\\blog\\3D_Data\\Test_cube_line.imo”) ;
Linux では mount すれば次の様な指定が可能なことは以前に調べている.
tstring test_imo = _T(“/mnt/ds116/web/i_Tools/Doc/blog/3D_Data/Test_cube_line.imo”) ;
今回は異なる方法で何か方法はないかと調べてみた.
結果としては「ファイルマネージャ」などでアクセスできる状態にする必要があるのであまり mount と変わらない.
調べたのは次の様な手順.
「端末」を開いて ls と入力.
そこに「ファイルマネージャ」からディレクトリをドロップ.
「端末」で「Enter」するとアクセスできることを確認.

tstring test_imo = _T(“/run/user/1000/gvfs/smb-share:server=ds116.local,share=web/i_Tools/Doc/blog/3D_Data/Test_cube_line.imo“) ;
VC Linux でのデバッグ
単純な「Linux ターミナル」の「コンソール AP」であれば,Windows コンソール AP と同様にデバッグできる.
出力は VS の「Linux コンソールウィンドウ」.

GLUT を使用したデバッグはこの方法ではできない?
::glutInit(&argc, argv); で抜けてしまう.
Linux 上で .out を起動しておいて VS の「デバッグ」-「プロセスにアタッチ」.
「接続の種類」を「SSH」にして「接続先」を Linux 環境に.

「使用可能なプロセス」が更新されるのでデバッグ対象の .out を選択して「アタッチ」でデバッグできる.
VC Linux で GLUT
GLUT を使用したコード
ビルドするとリンクでのエラーとなってしまう.
1>------ ビルド開始: プロジェクト: T_GL2, 構成: Debug x64 ------
1>ソースを検証します
1>リモートでソースを 'fedora' にコピーします
1>アーキテクチャを検証します
1>C:\Program Files (x86)\Microsoft Visual Studio\2019\Professional\MSBuild\Microsoft\VC\v160\Application Type\Linux\1.0\Linux.targets(184,5): warning : 配置で使用されるリモート システムに互換性のないプラットフォーム アーキテクチャ ('x64'、'ARM') があります。
1>アーキテクチャを検証します
1>リモート ビルドを開始しています
1>ソースをコンパイルします:
1>オブジェクトをリンクしています
1>/usr/bin/ld : error : /home/Iwao/projects/T_GL2/obj/x64/Debug/main.o: in function `idle()':
1>D:\Document\VS\VS\2019\T_Linux\T_GL2\main.cpp(51): error : undefined reference to `glutPostRedisplay'
1>/usr/bin/ld : error : /home/Iwao/projects/T_GL2/obj/x64/Debug/main.o: in function `display()':
1>D:\Document\VS\VS\2019\T_Linux\T_GL2\main.cpp(56): error : undefined reference to `glClear'
1>/usr/bin/ld : error : /home/Iwao/projects/T_GL2/main.cpp:63: undefined reference to `glMatrixMode'
1>/usr/bin/ld : error : /home/Iwao/projects/T_GL2/main.cpp:64: undefined reference to `glLoadIdentity'
1>/usr/bin/ld : error : /home/Iwao/projects/T_GL2/main.cpp:65: undefined reference to `gluLookAt'
1>/usr/bin/ld : error : /home/Iwao/projects/T_GL2/main.cpp:67: undefined reference to `glColor3d'
...
1>/usr/bin/ld : error : /home/Iwao/projects/T_GL2/main.cpp:165: undefined reference to `glutMainLoop'
1>collect2 : error : エラー: ld はステータス 1 で終了しました
1>プロジェクト "T_GL2.vcxproj" のビルドが終了しました -- 失敗。
========== ビルド: 0 正常終了、1 失敗、0 更新不要、0 スキップ ==========
コマンドでの -l オプションにあたる指定が足りないため.
「リンカー」-「コマンドライン」-「追加のオプション」に以下を追加.
-lglut -lGL -lGLU


VC Linux の include 設定
VC Linux プロジェクトの include 設定
次のようなコードをビルドするのに include の設定がわからなかった.
#include	<cstdio>
#include	"gettickc.hxx"

int main()
{
	printf("VC 2019 hello !\n");
	for (long index = 0; index < 100; index++) {
		::Sleep_ms(100);
		printf("hello \t");
		fflush(stdout);
		if (index%5 == 4)	{
			printf("\n");
			}
		}
	printf("VC 2019 hello !\n");
	return 0;
	}

MFC のプロジェクトなどであれば,次の所で指定している.
C:\Users\Iwao\AppData\Local\Microsoft\MSBuild\v4.0\Microsoft.Cpp.x64.user.props
共通のインクルードディレクトリは,次の様なもの.
\\DevS\Documents\Develop\_.SRC\__CPR_;\\DevS\Documents\Develop\_.SRC\__Iwao;…
ソース内で次の様に指定してもエラーに.
#include “\\DevS\Documents\Develop\_.SRC\__CPR_\i_define.hxx”
1>main.cpp
1>C:\Program Files (x86)\Microsoft Visual Studio\2019\Professional\MSBuild\Microsoft\VC\v160\Application Type\Linux\1.0\Linux.targets(412,5): error : g++ がコード 1 で終了しました。詳細については、出力ウィンドウでビルド出力をご確認ください (注: 出力ウィンドウで詳細を確認するには、ツール オプションでビルド出力の詳細度を変更する必要があります)。
1>プロジェクト "ConsoleApplication2.vcxproj" のビルドが終了しました -- 失敗。
他に #include “//devs/documents/develop/_.src/__cpr_/i_define.hxx” としてみたが変わらず.
Raspberry Pi でビルドするともう少しわかりやすいエラーの表示になった.
1>main.cpp
1>D:\Document\VS\VS\2019\T_Linux\ConsoleApplication2\main.cpp(18,10): error : \\DevS\Documents\Develop\_.SRC\__CPR_\i_define.hxx: そのようなファイルやディレクトリはありません
1>D:\Document\VS\VS\2019\T_Linux\ConsoleApplication2\main.cpp(18,10): error :  #include "\\DevS\Documents\Develop\_.SRC\__CPR_\i_define.hxx"
1>D:\Document\VS\VS\2019\T_Linux\ConsoleApplication2\main.cpp(18,10): error :           ^~~~~~~~~~~~~~~~~~~~~~~~~~~~~~~~~~~~~~~~~~~~~~~~~~~~
1>D:\Document\VS\VS\2019\T_Linux\ConsoleApplication2\main.cpp(18,10): error : compilation terminated.
1>プロジェクト "ConsoleApplication2.vcxproj" のビルドが終了しました -- 失敗。
いろいろやって,次の様に指定することでうまくいった.
#include “/mnt/_.src/__cpr_/i_define.hxx”
プロジェクトの設定で次のものを指定することでビルドできることを確認.
/mnt/_.src/__CPR_;/mnt/_.src/__Iwao;/mnt/_.src/__Mlt_;/mnt/_.src/_gcc;/mnt/_.src/Test
/mnt/_.src はマウントしている.
Linux から Windows 環境への接続
g++ インクルードパスの設定
Fedora への ssh 接続

Fedora では「設定」-「共有」-「リモートログイン」がそれにあたる.
VS でのリモートの設定 は「ツール」-「オプション」で開いた「クロスプラットフォーム」にある.

プロジェクトの設定も必要で「構成プロパティ」-「全般」の「リモートビルドマシン」.

これが合っていないとビルドエラーになる.
1>------ ビルド開始: プロジェクト: ConsoleApplication1, 構成: Release x64 ------
1>Validating sources
1>Copying sources remotely to '192.168.1.34'
1>Validating architecture
1>C:\Program Files (x86)\Microsoft Visual Studio\2017\Professional\Common7\IDE\VC\VCTargets\Application Type\Linux\1.0\Linux.targets(151,5): error : Current project architecture 'x64' is incompatible with the remote system architecture 'ARM' ('ARM'). Please switch the project architecture to 'ARM' in Configuration Manager.
1>プロジェクト "ConsoleApplication1.vcxproj" のビルドが終了しました -- 失敗。
========== ビルド: 0 正常終了、1 失敗、0 更新不要、0 スキップ ==========
Ubuntu では ssh サーバが入っていないみたいで次のコマンドでインストール.
$ sudo apt install openssh-server
何故か password を受け付けない?
Win10 19h1 のコマンドプロンプトで次の様にしても接続できない.
C:\Users\Iwao\AppData\Local\Temp>ssh -l Iwao -p 22 192.168.1.39
Iwao@192.168.1.39's password:
Permission denied, please try again.
Iwao@192.168.1.39's password:
何か他の設定が足りないのか?
設定関連のドキュメントは次の所にあった.
Linux ワークロードのダウンロード、インストール、セットアップ
VC 2017 Linux プロジェクト
VC 2017 を弄っていたら,Linux のプロジェクトの作成が可能になっていたので試してみた.
どのタイミングだったか忘れたが,SSH 接続が必要になる.
今まで設定してある Raspberry Pi に接続してみた.

Raspberry Pi 側の設定は「Raspberry Pi の設定」-「インターフェイス」にある.
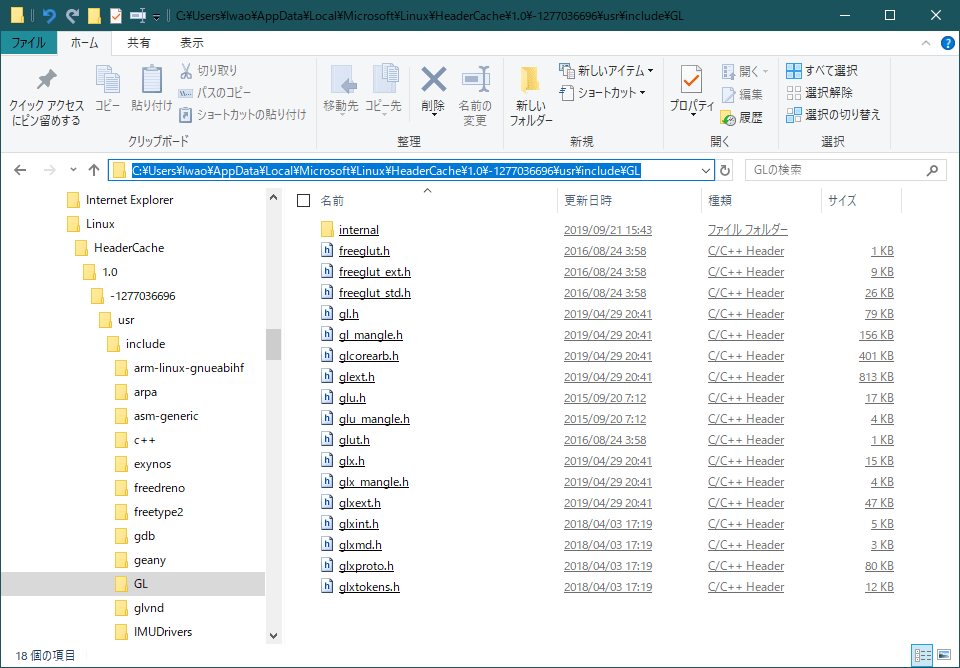
ビルド時に使用する include は以下にコピーされている.これは Raspberry Pi の /user/include と同じ内容?
C:\Users\Iwao\AppData\Local\Microsoft\Linux\HeaderCache\1.0\-1277036696\usr\include
ビルドして出来上がった .out は /home/pi/projects/…/bin/ARM/Release にある.

Raspberry Pi Desktop の設定
Raspberry Pi Desktop を自分好みにするためのいくつかの設定.
Scratch は「日本語」になっているが Scratch 2 は英語のまま.
「File」メニューの左をクリックすると言語が選べて,下の方に「日本語」がある.

ブラウザの Chromium
「メインメニュー」の「設定」-「Add / Remove Software」.

「Chromium」で検索して「ウェブブラウザ – 言語パック」にチェック.

「OK」でインストール.
私の個人的なテスト用サイトの表示は,持っている Raspberry Pi よりスムーズ?
itl.mydns.jp
Raspberry Pi Desktop インストール
「Debian Stretch with Raspberry Pi Desktop」のインストール

次の所を参考にインストール.
Windows PCにPIXEL(Raspberry Pi OS) for PCをインストールしてみよう (2/3)
見た目が異なるだけで指定内容はほぼ同じ.
もう一つ見つけたのは,
[メモ] VirtualBoxにて、Raspberry Pi Desktop(2017-11-16-rpd-x86-stretch版)
こちらは今とほぼ同じ様な表示で,こちらの方がわかりやすいかもしれない.
他の Linux 環境と同じようにするためのいくつかの設定.
/mnt/_.src を作成.
$ sudo mkdir /mnt/_.src
mount や CPATH を設定する set_z_inc.sh をコピー.

GLUT のインストール.
$ sudo apt install freeglut3 freeglut3-dev
$ g++ test.cpp -lGL -lGLU -lglut

PyOpenGL のインストール.
$ pip install PyOpenGL
$ pip install PyOpenGL_accelerate

Raspberry Pi にインストール
Raspberry Pi 用に micro SD を購入.
パッケージから micro SD を取り出すのがちょっと大変(金属部分に触ってしまいそう).
micro SD の動作確認のために「KoKaRasPi1181118.img」をコピーして OS が起動することを確認.
今度は Raspbian からのインストール.
ダウンロードできるページにアクセスすると幾つかあり.
https://www.raspberrypi.org/downloads/ NOOBS と Raspbian
今回は Raspbian Buster with desktop and recommended software を選択.
「2019-07-10-raspbian-buster-full.img」を microSD にコピー.
あとは Raspberry Pi に挿して起動.

幾つかの設定を「Japanese」に.
再起動して Wi-Fi などの設定後,ソフトウェアのアップデートに.これは 1 時間程度かかった.

また再起動して何とか使える状態に.
ssh で接続しようとすると,何かの設定をしなければならない様なメッセージ.
C:\Users\Iwao\AppData\Local\Temp>ssh -l pi 192.168.1.34
@@@@@@@@@@@@@@@@@@@@@@@@@@@@@@@@@@@@@@@@@@@@@@@@@@@@@@@@@@@
@    WARNING: REMOTE HOST IDENTIFICATION HAS CHANGED!     @
@@@@@@@@@@@@@@@@@@@@@@@@@@@@@@@@@@@@@@@@@@@@@@@@@@@@@@@@@@@
IT IS POSSIBLE THAT SOMEONE IS DOING SOMETHING NASTY!
Someone could be eavesdropping on you right now (man-in-the-middle attack)!
It is also possible that a host key has just been changed.
The fingerprint for the ECDSA key sent by the remote host is
SHA256:+XCHdOHLyB0hFfxDrAR2xEvYhuiylCLzFYhmznJyzYg.
Please contact your system administrator.
Add correct host key in C:\\Users\\Iwao/.ssh/known_hosts to get rid of this message.
Offending ECDSA key in C:\\Users\\Iwao/.ssh/known_hosts:1
ECDSA host key for 192.168.1.34 has changed and you have requested strict checking.
Host key verification failed.

C:\Users\Iwao\AppData\Local\Temp>
検索すると,
SSH接続で WARNING: REMOTE HOST IDENTIFICATION HAS CHANGED!
エディタで …/.ssh/known_hosts の 1 行目の 192.168.1.34 を 192.168.1.35 に.
もう一度,ssh -l pi 192.168.1.34 とすることで接続できた.
また,known_hosts には 192.168.1.34 が追加されている.
192.168.1.35 にしたものを 192.168.1.34 に戻すことで,前の SD でも動作可能なことを確認.

2019/09/21
microSD が増えてきたので,ケースを購入.
レビューにある様に,収まりが良くない.
PyOpenGL インストール – 2
今度は Ubuntu 環境へのインストール.
先ず Python 2.7 .
iwao@VB-Ubuntu:~$ sudo apt install python
[sudo] iwao のパスワード:
パッケージリストを読み込んでいます... 完了
依存関係ツリーを作成しています
状態情報を読み取っています... 完了
以下の追加パッケージがインストールされます:
  libpython-stdlib libpython2-stdlib libpython2.7-minimal libpython2.7-stdlib
  python-minimal python2 python2-minimal python2.7 python2.7-minimal
提案パッケージ:
  python-doc python-tk python2-doc python2.7-doc binfmt-support
以下のパッケージが新たにインストールされます:
  libpython-stdlib libpython2-stdlib libpython2.7-minimal libpython2.7-stdlib
  python python-minimal python2 python2-minimal python2.7 python2.7-minimal
アップグレード: 0 個、新規インストール: 10 個、削除: 0 個、保留: 9 個。
3,883 kB のアーカイブを取得する必要があります。
この操作後に追加で 16.7 MB のディスク容量が消費されます。
続行しますか? [Y/n]

続いて pip .
iwao@VB-Ubuntu:~$ pip

Command 'pip' not found, but can be installed with:

sudo apt install python-pip

iwao@VB-Ubuntu:~$ sudo apt install python-pip
パッケージリストを読み込んでいます... 完了
依存関係ツリーを作成しています
状態情報を読み取っています... 完了
以下の追加パッケージがインストールされます:
  javascript-common libexpat1 libexpat1-dev libjs-jquery libjs-sphinxdoc libjs-underscore libpython-all-dev
  libpython-dev libpython2-dev libpython2.7 libpython2.7-dev python-all python-all-dev python-asn1crypto
  python-cffi-backend python-configparser python-crypto python-cryptography python-dbus python-dev python-entrypoints
  python-enum34 python-gi python-idna python-ipaddress python-keyring python-keyrings.alt python-pip-whl
  python-pkg-resources python-secretstorage python-setuptools python-six python-wheel python-xdg python2-dev
  python2.7-dev
提案パッケージ:
  apache2 | lighttpd | httpd python-crypto-doc python-cryptography-doc python-cryptography-vectors python-dbus-dbg
  python-dbus-doc python-enum34-doc python-gi-cairo libkf5wallet-bin gir1.2-gnomekeyring-1.0 python-gdata
  python-keyczar python-secretstorage-doc python-setuptools-doc
以下のパッケージが新たにインストールされます:
  javascript-common libexpat1-dev libjs-jquery libjs-sphinxdoc libjs-underscore libpython-all-dev libpython-dev
  libpython2-dev libpython2.7 libpython2.7-dev python-all python-all-dev python-asn1crypto python-cffi-backend
  python-configparser python-crypto python-cryptography python-dbus python-dev python-entrypoints python-enum34
  python-gi python-idna python-ipaddress python-keyring python-keyrings.alt python-pip python-pip-whl
  python-pkg-resources python-secretstorage python-setuptools python-six python-wheel python-xdg python2-dev
  python2.7-dev
以下のパッケージはアップグレードされます:
  libexpat1
アップグレード: 1 個、新規インストール: 36 個、削除: 0 個、保留: 8 個。
37.0 MB 中 36.9 MB のアーカイブを取得する必要があります。
この操作後に追加で 72.7 MB のディスク容量が消費されます。
続行しますか? [Y/n]

PyOpenGL .
$ pip install PyOpenGL
$ pip install PyOpenGL_accelerate

Ubuntu はこのインストールで良いみたい.
Fedora の様に OpenGL.GL にあたるパッケージのインストールは必要なさそう.
Raspberry Pi へのインストール.
Python 2.7 は入っているので PyOpenGL のインストール.
$ pip install PyOpenGL
$ pip install PyOpenGL_accelerate

これだけ良いみたい.
2020/07/29
PyOpenGL 3.x The Python OpenGL Binding
PyOpenGL インストール
この記事は 2019/09 に書いたものです.
現在は Python 3.x 対応になっています.
PyOpenGL は Python 2.7 が奨励みたいで,Fedora 環境に Python 2.7 をインストール.

[Iwao@fedora ~]$ python
bash: python: コマンドが見つかりませんでした...
コマンド python' を提供するためにパッケージ 'python-unversioned-command' をインストールしますか? [N/y] y

 * キューで待機中...
 * パッケージの一覧をロード中。...
以下のパッケージはインストールされるべきものです:
 gdbm-1:1.18-4.fc30.x86_64	A GNU set of database routines which use extensible hashing
 python-unversioned-command-2.7.16-2.fc30.noarch	The "python" command that runs Python 2
 python2-2.7.16-2.fc30.x86_64	An interpreted, interactive, object-oriented programming language
 python2-libs-2.7.16-2.fc30.x86_64	Runtime libraries for Python 2
 python2-pip-19.0.3-3.fc30.noarch	A tool for installing and managing Python 2 packages
 python2-setuptools-40.8.0-1.fc30.noarch	Easily build and distribute Python packages
変更したまま継続しますか? [N/y] y

 * キューで待機中...
 * 認証を待ち受け中...
 * キューで待機中...
 * パッケージをダウンロード中...
 * データを要求中...
 * 変更をテスト中...
 * パッケージのインストール中...

[Iwao@fedora ~]$
次は PyOpenGL のインストール.
インストールは次のものらしい.
$ pip install PyOpenGL
$ pip install PyOpenGL_accelerate
【Python】PyOpenGLのインストールからウィンドウ表示まで
PythonのOpenGLライブラリ「PyOpenGL」はPython3系では動かないのね
次の様なウィンドウを表示するだけのコードでエラー.
ImportError: No module named OpenGL.GL
from OpenGL.GL   import *
from OpenGL.GLUT import *

def draw():
    glClearColor(1.0, 1.0, 0.5, 0.0)
    glClear(GL_COLOR_BUFFER_BIT | GL_DEPTH_BUFFER_BIT)
    glFlush()
    glutSwapBuffers()

def main():
    glutInit(sys.argv)
    glutInitDisplayMode(GLUT_RGBA | GLUT_DOUBLE | GLUT_DEPTH)
    glutInitWindowSize(300, 300)
    glutCreateWindow("PyOpenGL")
    glutDisplayFunc(draw)
    glutMainLoop()

main()
[Iwao@fedora pyopengl]$ python test.py Traceback (most recent call last): File "test.py", line 3, infrom OpenGL.GL import * ImportError: No module named OpenGL.GL [Iwao@fedora pyopengl]$
OpenGL 関係が足りないみたいで検索すると python-pyopengl が必要とある.
Pythonでグラフィックやるには?
[Iwao@fedora py_math]$ sudo dnf install python-pyopengl*
[sudo] Iwao のパスワード:
メタデータの期限切れの最終確認: 0:57:14 時間前の 2019年09月13日 16時39分16秒 に実施しました。
依存関係が解決しました。
================================================================================
 Package                Architecture Version                Repository     Size
================================================================================
インストール:
 python2-pyopengl       x86_64       3.1.1a1-15.fc30        fedora        2.4 M
依存関係のインストール:
 openblas-threads       x86_64       0.3.7-1.fc30           updates       4.8 M
 python2-numpy          x86_64       1:1.16.4-2.fc30        updates       3.9 M
 python2-nose           noarch       1.3.7-22.fc30          fedora        261 k
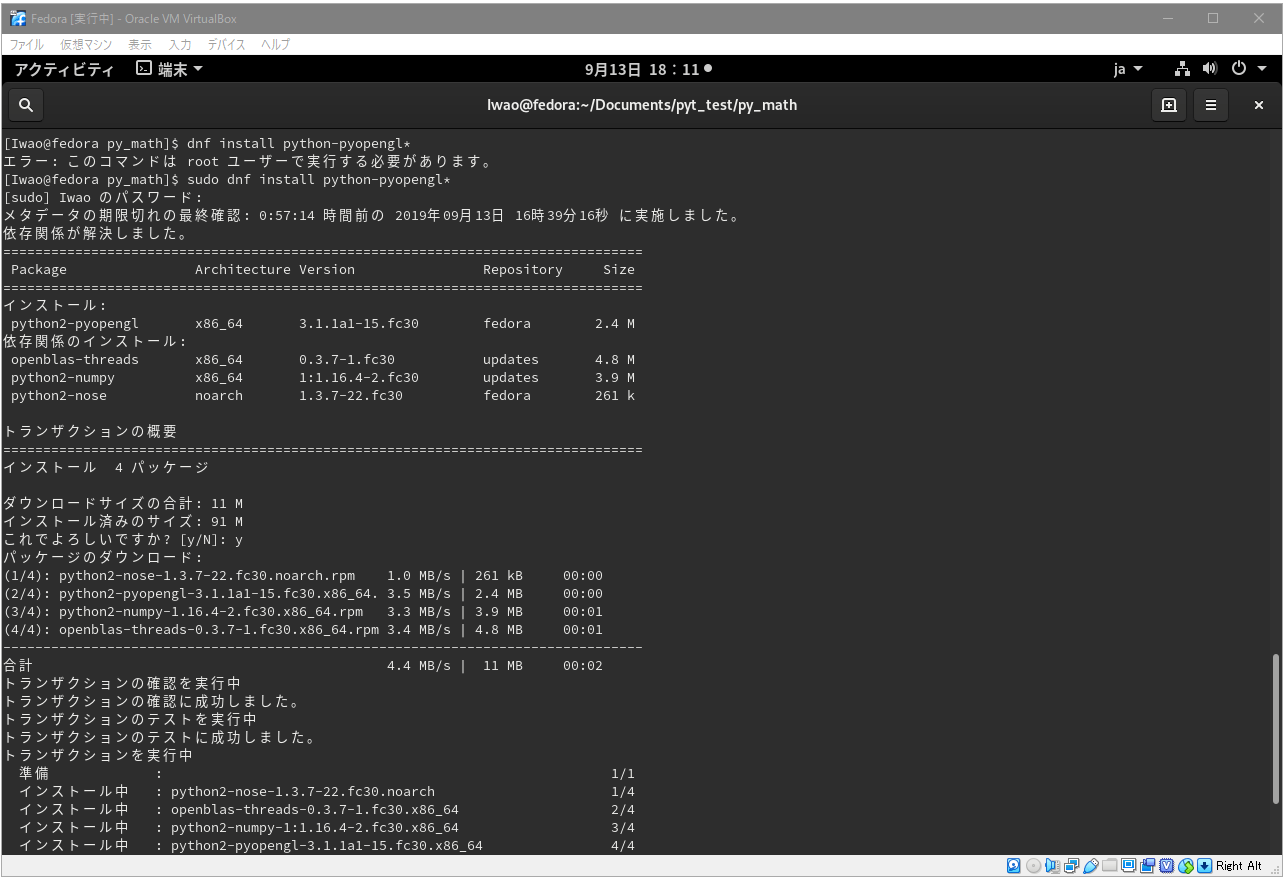
これで実行できるようになった.

2020/07/31
PyOpenGL 3.x The Python OpenGL Binding
Python のインストール状態
PyOpenGL を使えるようにしたいと思い Python のインストール状態を調べてみた.
PyOpenGL は Python 2.7 が奨励となっている?
Ubuntu

iwao@VB-Ubuntu:~$ python

Command 'python' not found, but can be installed with:

sudo apt install python3         # version 3.7.3-1, or
sudo apt install python          # version 2.7.16-1
sudo apt install python-minimal  # version 2.7.16-1

You also have python3 installed, you can run 'python3' instead.

iwao@VB-Ubuntu:~$ python3
Python 3.7.3 (default, Aug 20 2019, 17:04:43)
[GCC 8.3.0] on linux
Type "help", "copyright", "credits" or "license" for more information.
>>>
iwao@VB-Ubuntu:~$
Fedora

[Iwao@fedora ~]$ python
bash: python: コマンドが見つかりませんでした...
コマンド python' を提供するためにパッケージ 'python-unversioned-command' をインストールしますか? [N/y] n


[Iwao@fedora ~]$ python3
Python 3.7.4 (default, Jul  9 2019, 16:32:37)
[GCC 9.1.1 20190503 (Red Hat 9.1.1-1)] on linux
Type "help", "copyright", "credits" or "license" for more information.
>>>
[Iwao@fedora ~]$
Raspberry Pi

pi@raspberrypi:~ $ python
Python 2.7.13 (default, Sep 26 2018, 18:42:22)
[GCC 6.3.0 20170516] on linux2
Type "help", "copyright", "credits" or "license" for more information.
>>>
pi@raspberrypi:~ $ python3
Python 3.5.3 (default, Sep 27 2018, 17:25:39)
[GCC 6.3.0 20170516] on linux
Type "help", "copyright", "credits" or "license" for more information.
>>>
pi@raspberrypi:~ $
Win10 (VS 2017 , VS 2019)

Microsoft Windows [Version 10.0.18362.356]
(c) 2019 Microsoft Corporation. All rights reserved.

C:\Users\Iwao>py
Python 3.7.3 (v3.7.3:ef4ec6ed12, Mar 25 2019, 22:22:05) [MSC v.1916 64 bit (AMD64)] on win32
Type "help", "copyright", "credits" or "license" for more information.
>>> ^Z


C:\Users\Iwao>where py
C:\Windows\py.exe

C:\Users\Iwao>

VS 2013 以降の「新規プロジェクト」で「Python」がある.

g++ インクルードパスの設定
先日,Windows 環境に mount することで C++ の共通のコードを参照できる様になった.
今度は,これらを使用してコンパイルできるようにするための設定.
g++ file.cpp -I/mnt/_.src/__CPR_ などと指定すれば可能だが,これらのパスを 環境変数 に登録.
[Iwao@fedora first]$ g++ T_P_ini.cpp -I/mnt/_.src/__CPR_ -I/mnt/_.src/__Iwao -I/mnt/_.src/__Mlt_ -I/mnt/_.src/_gcc -Wall
In file included from /mnt/_.src/__Iwao/delff_e.hxx:14,
                 from /mnt/_.src/__CPR_/filefnc.hxx:13,
                 from /mnt/_.src/__CPR_/i_Trace.hxx:16,
                 from T_P_ini.cpp:5:
/mnt/_.src/__Iwao/enumfile.hxx:33:56: 備考: #pragma message: EnumFile.hxx MessageBar  No Support
   33 | #pragma  message ("EnumFile.hxx MessageBar  No Support")
      |                                                        ^
[Iwao@fedora first]$ ./a.out
Iwao
Iwao
[Iwao@fedora first]$

[Iwao@fedora first]$ export CPATH=/mnt/_.src/__CPR_:/mnt/_.src/__Iwao:/mnt/_.src/__Mlt_:/mnt/_.src/_gcc
[Iwao@fedora first]$ g++ T_P_ini.cpp -Wall
In file included from /mnt/_.src/__Iwao/delff_e.hxx:14,
                 from /mnt/_.src/__CPR_/filefnc.hxx:13,
                 from /mnt/_.src/__CPR_/i_Trace.hxx:16,
                 from T_P_ini.cpp:5:
/mnt/_.src/__Iwao/enumfile.hxx:33:56: 備考: #pragma message: EnumFile.hxx MessageBar  No Support
   33 | #pragma  message ("EnumFile.hxx MessageBar  No Support")
      |                                                        ^
[Iwao@fedora first]$

export の部分を sh ファイルに
[Iwao@fedora first]$ cat set_z_inc.sh
#!/bin/bash
export	CPATH=/mnt/_.src/__CPR_
export	CPATH=$CPATH:/mnt/_.src/__Iwao
export	CPATH=$CPATH:/mnt/_.src/__Mlt_
export	CPATH=$CPATH:/mnt/_.src/_gcc
export	CPATH=$CPATH:/mnt/_.src/Test

[Iwao@fedora first]$ source ./set_z_inc.sh
: コマンドが見つかりませんでした...
[Iwao@fedora first]$
登録内容を見てみると何かおかしい.
[Iwao@fedora first]$ export
declare -x BASH_ENV="/usr/share/Modules/init/bash"
declare -x COLORTERM="truecolor"
"/mnt/_.src/Testt_/mnt/_.src/__CPR_
declare -x DBUS_SESSION_BUS_ADDRESS="unix:path=/run/user/1000/bus"
...
原因は改行コード.CRLF になっていたので LF に.

本当はもっと良い方法があるとは思うが,まだそこまで理解できていない.


ここまでで何とか思ったことまでは可能.
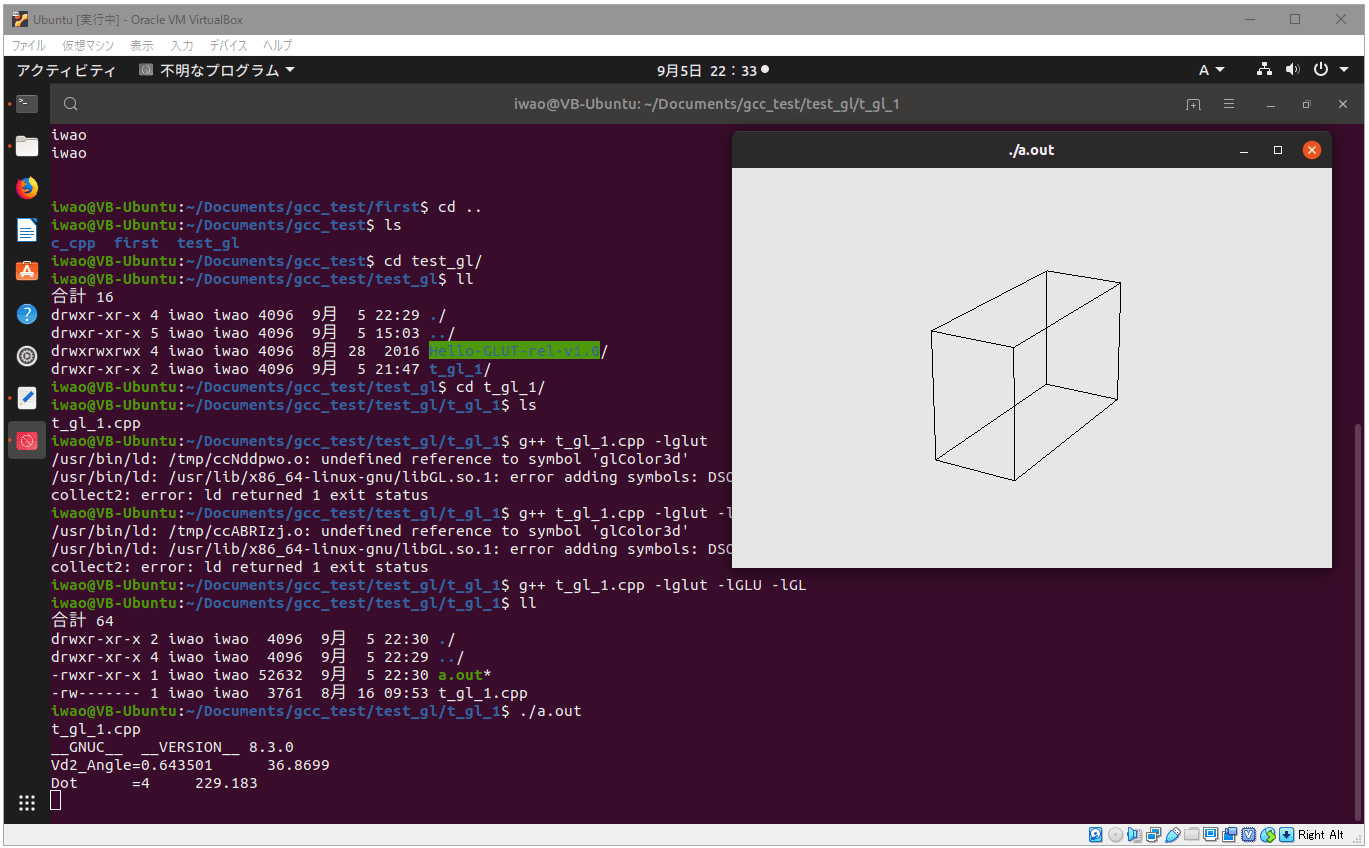
5 年前に GLUT を調べた 時のコードを,最近のコードで動作するように少し編集.

こちらは当時のコードそのまま.Pick07.cpp

コンパイルオプション -Dname=…
コンパイル時のオプションで -DVER=2019.09 の様な指定を使いたくなったので調べてみた.
コードは次のようなもの.
#include	<iostream>
#include	<iomanip>

#ifndef	Test_Ver_F
#define	Test_Ver_F  2019.0902
#endif

int	main	(int argc,   char* argv[])
{
	{
		std::cout                            	<< Test_Ver_F  << std::endl ;
		std::cout <<  std::setprecision(20)  	<< Test_Ver_F  << std::endl ;
		}
	return	0 ;
	}
pi@raspberrypi:~/Documents/test_gcc/t_ccsw_d $ g++ t_ccsw_d.cpp
pi@raspberrypi:~/Documents/test_gcc/t_ccsw_d $ ./a.out
2019.09
2019.0902000000000953
pi@raspberrypi:~/Documents/test_gcc/t_ccsw_d $ g++ t_ccsw_d.cpp -DTest_Ver_F=2019.0902
pi@raspberrypi:~/Documents/test_gcc/t_ccsw_d $ ./a.out
2019.09
2019.0902000000000953
pi@raspberrypi:~/Documents/test_gcc/t_ccsw_d $ g++ t_ccsw_d.cpp -DTest_Ver_F="2019.0902"
pi@raspberrypi:~/Documents/test_gcc/t_ccsw_d $ ./a.out
2019.09
2019.0902000000000953
pi@raspberrypi:~/Documents/test_gcc/t_ccsw_d $ g++ t_ccsw_d.cpp -DTest_Ver_F=\"2019.0902\"
pi@raspberrypi:~/Documents/test_gcc/t_ccsw_d $ ./a.out
2019.0902
2019.0902
pi@raspberrypi:~/Documents/test_gcc/t_ccsw_d $ g++ t_ccsw_d.cpp -DTest_Ver_F=\"2019.09.02\"
pi@raspberrypi:~/Documents/test_gcc/t_ccsw_d $ ./a.out
2019.09.02
2019.09.02
pi@raspberrypi:~/Documents/test_gcc/t_ccsw_d $
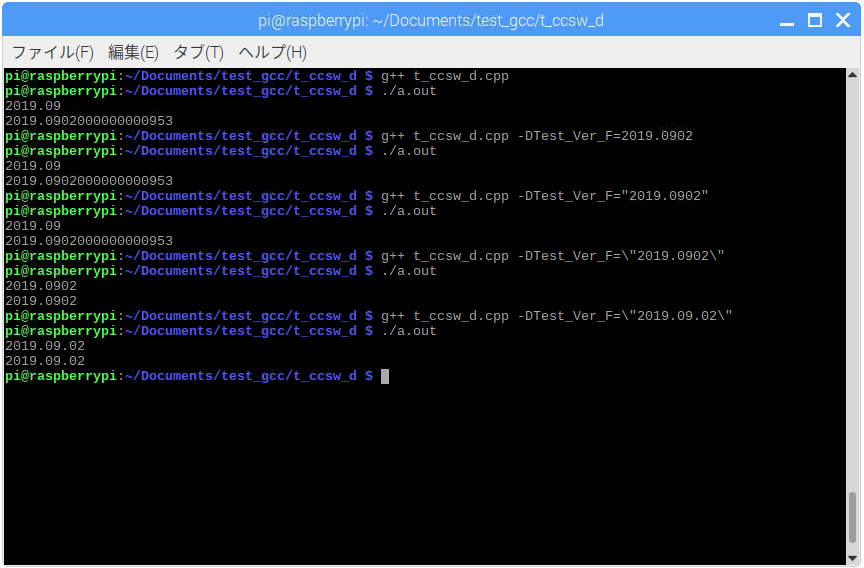
2019.0902 の様な浮動小数点の指定は特に変わった所はない.
但し浮動小数点による誤差などは考慮が必要.
文字列として扱いたいときは \” で括ればよい.
Raspberry Pi が起動しなくなった?
2020/09 追記
Raspberry Pi 4 Model B の場合,もう一つの HDMI ポートにつなげてみてください.
Raspberry Pi 4(ラズパイ)起動!虹画面フリーズの原因は意外なものだった…
以下は Raspberry Pi 3 Model B で SD が壊れた時の対応です.
「ジブン専用パソコンキット2」が起動しなくなってしまった.
Raspberry Pi の電源を入れて,赤いランプは点くが,緑のランプが点かない.
そうなった原因はわかっている.
「sudo apt upgrade 」として途中で止まってしまった?
進まない様に思った(緑のランプが点滅していない)ので,別のターミナルから再起動「sudo shutdown -r now 」.
終了はしたが,起動しなくなってしまった.
「micro SD」と「メモリリーダライタ」を購入.
今思うと「メモリリーダライタ」は USB 3 の方が良かった.
「micro SD」は最初付属していたものより速いのでこれで十分かなと思う.
「ジブン専用パソコン2」のバックアップデータを落として,SD にコピー.
ちゃんと起動するようになった.
「無線 LAN」を設定して「SSH」と「VNC」を有効に.

「sudo apt upgrade 」とすると,容量が足りないでエラーに.
SD 容量をすべて使用するために「sudo raspi-config 」.
「7 Advanced Options 」,「A1 Expand Filesystem 」を実行.
「終了」して「再起動」すると,また起動しなくなってしまった.
「KoKaRasPi1181118.img」をコピーするところからやり直し.
今度は先に「sudo raspi-config 」で SD すべてを使用する様に.
続いて「sudo apt upgrade 」.
何とかうまくいった.

8 GB の SD ではもううまくないのかもしれない.
pi@raspberrypi:~ $ df -h
ファイルシス   サイズ  使用  残り 使用% マウント位置
/dev/root         15G  5.9G  7.9G   43% /
devtmpfs         459M     0  459M    0% /dev
tmpfs            464M     0  464M    0% /dev/shm
tmpfs            464M   13M  451M    3% /run
tmpfs            5.0M  4.0K  5.0M    1% /run/lock
tmpfs            464M     0  464M    0% /sys/fs/cgroup
/dev/mmcblk0p1    44M   23M   21M   52% /boot
tmpfs             93M     0   93M    0% /run/user/1000
pi@raspberrypi:~ $
Linux から Windows 環境への接続
先日は「ファイルマネージャ」での Windows 環境へのアクセスだったが,今度はマウント.
検索すると以下の所に詳しく書かれていた.
LinuxからWindowsの共有フォルダをマウントするには
実際に操作したのは,
$ sudo mkdir /mnt/_.src
$ sudo mount -t cifs -o username=pi,password=raspberry //Z170S0/Public/…/Develop/_.SRC /mnt/_.src
Fedora ではこれでうまくいったが,Ubuntu ではエラー.
Fedora 環境は先日いろいろ弄って Samba の関係を入れたが Ubuntu はまだだった.
$ sudo apt install samba
$ sudo apt install cifs-utils
* samba のインストールは不要?
Z170S0 ではエラーとなり IP アドレスで指定したらうまくいった.
$ sudo mount -t cifs -o username=pi,password=raspberry //192.168.1.169/Public/…/Develop/_.SRC /mnt/_.src

Linux から Windows 環境のファイル
先日 Linux 環境から NAS 環境のファイルアクセスの手順などはある程度分かった.
今度は Windows 環境のファイルへのアクセス.
「他の場所」を選んだ時「Z170S0」が表示されていた(表示されないこともあり).
表示されていない時は「サーバへの接続」欄に smb://z170s0/ で可能.

選択するとパスワードを求められるが,これがうまく入らなかった(何を指定すれば良いかがわからなかった).
Raspberry Pi 上からも同じ様な感じで見えていたので試すと「pi」で入れた.
Ubuntu や Fedora でも「pi」で入れることがわかった.


「pi」で入ることで「Everyone」として扱われているものと思われる.


