
LNK1143 : ファイルが無効であるか…
VC 6 で 2017/04 頃のプロジェクトをビルドすると,
fatal error LNK1143: ファイルが無効であるか、 または壊れています: COMDAT セクション 0xFFFF8000 のシンボルがありません。
--------------------構成: GLSmth - Win32 Release--------------------
GLSm.exe - エラー 0、警告 0
--------------------構成: GLSmth - Win32 Debug--------------------
GLSm.exe - エラー 0、警告 0
--------------------構成: T_tjs_1 - Win32 Release--------------------
T_tjs_1.exe - エラー 0、警告 0
--------------------構成: T_tjs_1 - Win32 Debug--------------------
T_tjs_1.exe - エラー 0、警告 0
--------------------構成: T_tjs_2 - Win32 Release--------------------
T_tjs_2.exe - エラー 0、警告 0
--------------------構成: T_tjs_2 - Win32 Debug--------------------
T_tjs_2.exe - エラー 0、警告 0
--------------------構成: T_tjs_3 - Win32 Release--------------------
T_tjs_3.exe - エラー 0、警告 0
--------------------構成: T_tjs_3 - Win32 Debug--------------------
T_tjs_3.exe - エラー 0、警告 0
--------------------構成: T_tjs_4 - Win32 Release--------------------
T_tjs_4.exe - エラー 0、警告 0
--------------------構成: T_tjs_4 - Win32 Debug--------------------
コンパイル中...
T_tjs_4.cpp
...
c:\program files\microsoft visual studio\vc98\mfc\include\afxtempl.h(439) : fatal error C1076: コンパイラの制限 : ヒープの領域を使い果たしました; 上限を設定するために /Zm オプションを使用してください。
        c:\program files\microsoft visual studio\vc98\include\xlocmon(106): クラス テンプレートのメンバ関数 'void __thiscall CArray::SetAtGrow(int,class Material)' のコンパイル中
cl.exe の実行エラー
T_tjs_4.exe - エラー 1、警告 0
--------------------構成: thrjs_3d - Win32 Release--------------------
thrjs_3d.exe - エラー 0、警告 0
--------------------構成: thrjs_3d - Win32 Debug--------------------
thrjs_3d.exe - エラー 0、警告 0
--------------------構成: thrjs_mb - Win32 Release--------------------
thrjs_mb.exe - エラー 0、警告 0
--------------------構成: thrjs_mb - Win32 Debug--------------------
リンク中...
thrjs_mb.obj : fatal error LNK1143: ファイルが無効であるか、 または壊れています: COMDAT セクション 0xFFFF8000 のシンボルがありません。
link.exe の実行エラー

thrjs_mb.exe - エラー 1、警告 0
--------------------構成: thrjs_mk - Win32 Release--------------------
thrjs_mk.exe - エラー 0、警告 0
--------------------構成: thrjs_mk - Win32 Debug--------------------
thrjs_mk.exe - エラー 0、警告 0
最初 C1076 のエラーがあったが,この対応には /Zm150 を追加.
GLSmth 以外のプロジェクトは,コンソール AP .

VC 7 や 8 では問題なくビルドできる.
これらのプロジェクトでは main() を含む cpp に他の cpp をインクルードしている.
VC 6 では,ある大きさを超える cpp のコンパイルで正しく obj が作成できないみたい.
出来上がっている obj のファイルサイズは 21 MB 位.
main を含むソースを分割することで対応可能.
//itl.mydns.jp/ のパンくずリスト …
先日届いたメール.
https://itl.mydns.jp/joomla/ のパンくずリスト マークアップを修正する
Google Search Console Team <sc-noreply@google.com>
2019/09/20 (金) 17:46
Message type: [WNC-20064166]
Search Console
https://itl.mydns.jp/joomla/ でパンくずリスト マークアップを修正する
Google システムによってお客様のサイトが 15パンくずリスト マークアップに関する問題の例 の問題があると判断されました。このため、お客様サイトのパンくずリストのページが Google 検索でリッチリザルトとして表示されない可能性があります。
Search Console では、このリッチリザルト タイプ専用の新しいレポートをご利用いただけます。新しいレポートでは、検索結果でリッチリザルトが正しく表示されるよう、問題のあるページを特定および修正し、Google に再送信することができます。
パンくずリストレポートを開く
Google LLC, 1600 Amphitheatre Parkway Mountain View, CA 94043 | このメールは、Google Search Console にサイトが登録されているすべてのお客様にお送りしています | この種類のメッセージの配信を停止する
パートナーを追加この Search Console アカウントについてのメッセージを受信するパートナーを追加できます
Joomla! ページの「パンくずリスト」の様だが,よくわからない.

特に何もしていないのに,メールの時点から減っている.
対応方法がわからないので様子見.
2019/09/30 特に何もしていないが,エラーは 0 になっている.

Raspberry Pi Desktop の設定
Raspberry Pi Desktop を自分好みにするためのいくつかの設定.
Scratch は「日本語」になっているが Scratch 2 は英語のまま.
「File」メニューの左をクリックすると言語が選べて,下の方に「日本語」がある.

ブラウザの Chromium
「メインメニュー」の「設定」-「Add / Remove Software」.

「Chromium」で検索して「ウェブブラウザ – 言語パック」にチェック.

「OK」でインストール.
私の個人的なテスト用サイトの表示は,持っている Raspberry Pi よりスムーズ?
itl.mydns.jp
Raspberry Pi Desktop インストール
「Debian Stretch with Raspberry Pi Desktop」のインストール

次の所を参考にインストール.
Windows PCにPIXEL(Raspberry Pi OS) for PCをインストールしてみよう (2/3)
見た目が異なるだけで指定内容はほぼ同じ.
もう一つ見つけたのは,
[メモ] VirtualBoxにて、Raspberry Pi Desktop(2017-11-16-rpd-x86-stretch版)
こちらは今とほぼ同じ様な表示で,こちらの方がわかりやすいかもしれない.
他の Linux 環境と同じようにするためのいくつかの設定.
/mnt/_.src を作成.
$ sudo mkdir /mnt/_.src
mount や CPATH を設定する set_z_inc.sh をコピー.

GLUT のインストール.
$ sudo apt install freeglut3 freeglut3-dev
$ g++ test.cpp -lGL -lGLU -lglut

PyOpenGL のインストール.
$ pip install PyOpenGL
$ pip install PyOpenGL_accelerate

VNC Viewer での画面コピー
検索すると設定があることは見つかるが,設定場所が見当たらない.
VNC Viewer のメニューから「Properties…」を開くと,「Options」タブ内にあった.

「Pass special keys …」のチェックを外すことで意図した動作に.
2023/04/06
どこが原因かは不明だが,VNC を通した画面コピーで 3 ピクセルずれる.
![]()
![]()
Raspberry Pi にインストール
Raspberry Pi 用に micro SD を購入.
パッケージから micro SD を取り出すのがちょっと大変(金属部分に触ってしまいそう).
micro SD の動作確認のために「KoKaRasPi1181118.img」をコピーして OS が起動することを確認.
今度は Raspbian からのインストール.
ダウンロードできるページにアクセスすると幾つかあり.
https://www.raspberrypi.org/downloads/ NOOBS と Raspbian
今回は Raspbian Buster with desktop and recommended software を選択.
「2019-07-10-raspbian-buster-full.img」を microSD にコピー.
あとは Raspberry Pi に挿して起動.

幾つかの設定を「Japanese」に.
再起動して Wi-Fi などの設定後,ソフトウェアのアップデートに.これは 1 時間程度かかった.

また再起動して何とか使える状態に.
ssh で接続しようとすると,何かの設定をしなければならない様なメッセージ.
C:\Users\Iwao\AppData\Local\Temp>ssh -l pi 192.168.1.34
@@@@@@@@@@@@@@@@@@@@@@@@@@@@@@@@@@@@@@@@@@@@@@@@@@@@@@@@@@@
@    WARNING: REMOTE HOST IDENTIFICATION HAS CHANGED!     @
@@@@@@@@@@@@@@@@@@@@@@@@@@@@@@@@@@@@@@@@@@@@@@@@@@@@@@@@@@@
IT IS POSSIBLE THAT SOMEONE IS DOING SOMETHING NASTY!
Someone could be eavesdropping on you right now (man-in-the-middle attack)!
It is also possible that a host key has just been changed.
The fingerprint for the ECDSA key sent by the remote host is
SHA256:+XCHdOHLyB0hFfxDrAR2xEvYhuiylCLzFYhmznJyzYg.
Please contact your system administrator.
Add correct host key in C:\\Users\\Iwao/.ssh/known_hosts to get rid of this message.
Offending ECDSA key in C:\\Users\\Iwao/.ssh/known_hosts:1
ECDSA host key for 192.168.1.34 has changed and you have requested strict checking.
Host key verification failed.

C:\Users\Iwao\AppData\Local\Temp>
検索すると,
SSH接続で WARNING: REMOTE HOST IDENTIFICATION HAS CHANGED!
エディタで …/.ssh/known_hosts の 1 行目の 192.168.1.34 を 192.168.1.35 に.
もう一度,ssh -l pi 192.168.1.34 とすることで接続できた.
また,known_hosts には 192.168.1.34 が追加されている.
192.168.1.35 にしたものを 192.168.1.34 に戻すことで,前の SD でも動作可能なことを確認.

2019/09/21
microSD が増えてきたので,ケースを購入.
レビューにある様に,収まりが良くない.
PyOpenGL インストール – 2
今度は Ubuntu 環境へのインストール.
先ず Python 2.7 .
iwao@VB-Ubuntu:~$ sudo apt install python
[sudo] iwao のパスワード:
パッケージリストを読み込んでいます... 完了
依存関係ツリーを作成しています
状態情報を読み取っています... 完了
以下の追加パッケージがインストールされます:
  libpython-stdlib libpython2-stdlib libpython2.7-minimal libpython2.7-stdlib
  python-minimal python2 python2-minimal python2.7 python2.7-minimal
提案パッケージ:
  python-doc python-tk python2-doc python2.7-doc binfmt-support
以下のパッケージが新たにインストールされます:
  libpython-stdlib libpython2-stdlib libpython2.7-minimal libpython2.7-stdlib
  python python-minimal python2 python2-minimal python2.7 python2.7-minimal
アップグレード: 0 個、新規インストール: 10 個、削除: 0 個、保留: 9 個。
3,883 kB のアーカイブを取得する必要があります。
この操作後に追加で 16.7 MB のディスク容量が消費されます。
続行しますか? [Y/n]

続いて pip .
iwao@VB-Ubuntu:~$ pip

Command 'pip' not found, but can be installed with:

sudo apt install python-pip

iwao@VB-Ubuntu:~$ sudo apt install python-pip
パッケージリストを読み込んでいます... 完了
依存関係ツリーを作成しています
状態情報を読み取っています... 完了
以下の追加パッケージがインストールされます:
  javascript-common libexpat1 libexpat1-dev libjs-jquery libjs-sphinxdoc libjs-underscore libpython-all-dev
  libpython-dev libpython2-dev libpython2.7 libpython2.7-dev python-all python-all-dev python-asn1crypto
  python-cffi-backend python-configparser python-crypto python-cryptography python-dbus python-dev python-entrypoints
  python-enum34 python-gi python-idna python-ipaddress python-keyring python-keyrings.alt python-pip-whl
  python-pkg-resources python-secretstorage python-setuptools python-six python-wheel python-xdg python2-dev
  python2.7-dev
提案パッケージ:
  apache2 | lighttpd | httpd python-crypto-doc python-cryptography-doc python-cryptography-vectors python-dbus-dbg
  python-dbus-doc python-enum34-doc python-gi-cairo libkf5wallet-bin gir1.2-gnomekeyring-1.0 python-gdata
  python-keyczar python-secretstorage-doc python-setuptools-doc
以下のパッケージが新たにインストールされます:
  javascript-common libexpat1-dev libjs-jquery libjs-sphinxdoc libjs-underscore libpython-all-dev libpython-dev
  libpython2-dev libpython2.7 libpython2.7-dev python-all python-all-dev python-asn1crypto python-cffi-backend
  python-configparser python-crypto python-cryptography python-dbus python-dev python-entrypoints python-enum34
  python-gi python-idna python-ipaddress python-keyring python-keyrings.alt python-pip python-pip-whl
  python-pkg-resources python-secretstorage python-setuptools python-six python-wheel python-xdg python2-dev
  python2.7-dev
以下のパッケージはアップグレードされます:
  libexpat1
アップグレード: 1 個、新規インストール: 36 個、削除: 0 個、保留: 8 個。
37.0 MB 中 36.9 MB のアーカイブを取得する必要があります。
この操作後に追加で 72.7 MB のディスク容量が消費されます。
続行しますか? [Y/n]

PyOpenGL .
$ pip install PyOpenGL
$ pip install PyOpenGL_accelerate

Ubuntu はこのインストールで良いみたい.
Fedora の様に OpenGL.GL にあたるパッケージのインストールは必要なさそう.
Raspberry Pi へのインストール.
Python 2.7 は入っているので PyOpenGL のインストール.
$ pip install PyOpenGL
$ pip install PyOpenGL_accelerate

これだけ良いみたい.
2020/07/29
PyOpenGL 3.x The Python OpenGL Binding
PyOpenGL インストール
この記事は 2019/09 に書いたものです.
現在は Python 3.x 対応になっています.
PyOpenGL は Python 2.7 が奨励みたいで,Fedora 環境に Python 2.7 をインストール.

[Iwao@fedora ~]$ python
bash: python: コマンドが見つかりませんでした...
コマンド python' を提供するためにパッケージ 'python-unversioned-command' をインストールしますか? [N/y] y

 * キューで待機中...
 * パッケージの一覧をロード中。...
以下のパッケージはインストールされるべきものです:
 gdbm-1:1.18-4.fc30.x86_64	A GNU set of database routines which use extensible hashing
 python-unversioned-command-2.7.16-2.fc30.noarch	The "python" command that runs Python 2
 python2-2.7.16-2.fc30.x86_64	An interpreted, interactive, object-oriented programming language
 python2-libs-2.7.16-2.fc30.x86_64	Runtime libraries for Python 2
 python2-pip-19.0.3-3.fc30.noarch	A tool for installing and managing Python 2 packages
 python2-setuptools-40.8.0-1.fc30.noarch	Easily build and distribute Python packages
変更したまま継続しますか? [N/y] y

 * キューで待機中...
 * 認証を待ち受け中...
 * キューで待機中...
 * パッケージをダウンロード中...
 * データを要求中...
 * 変更をテスト中...
 * パッケージのインストール中...

[Iwao@fedora ~]$
次は PyOpenGL のインストール.
インストールは次のものらしい.
$ pip install PyOpenGL
$ pip install PyOpenGL_accelerate
【Python】PyOpenGLのインストールからウィンドウ表示まで
PythonのOpenGLライブラリ「PyOpenGL」はPython3系では動かないのね
次の様なウィンドウを表示するだけのコードでエラー.
ImportError: No module named OpenGL.GL
from OpenGL.GL   import *
from OpenGL.GLUT import *

def draw():
    glClearColor(1.0, 1.0, 0.5, 0.0)
    glClear(GL_COLOR_BUFFER_BIT | GL_DEPTH_BUFFER_BIT)
    glFlush()
    glutSwapBuffers()

def main():
    glutInit(sys.argv)
    glutInitDisplayMode(GLUT_RGBA | GLUT_DOUBLE | GLUT_DEPTH)
    glutInitWindowSize(300, 300)
    glutCreateWindow("PyOpenGL")
    glutDisplayFunc(draw)
    glutMainLoop()

main()
[Iwao@fedora pyopengl]$ python test.py Traceback (most recent call last): File "test.py", line 3, infrom OpenGL.GL import * ImportError: No module named OpenGL.GL [Iwao@fedora pyopengl]$
OpenGL 関係が足りないみたいで検索すると python-pyopengl が必要とある.
Pythonでグラフィックやるには?
[Iwao@fedora py_math]$ sudo dnf install python-pyopengl*
[sudo] Iwao のパスワード:
メタデータの期限切れの最終確認: 0:57:14 時間前の 2019年09月13日 16時39分16秒 に実施しました。
依存関係が解決しました。
================================================================================
 Package                Architecture Version                Repository     Size
================================================================================
インストール:
 python2-pyopengl       x86_64       3.1.1a1-15.fc30        fedora        2.4 M
依存関係のインストール:
 openblas-threads       x86_64       0.3.7-1.fc30           updates       4.8 M
 python2-numpy          x86_64       1:1.16.4-2.fc30        updates       3.9 M
 python2-nose           noarch       1.3.7-22.fc30          fedora        261 k
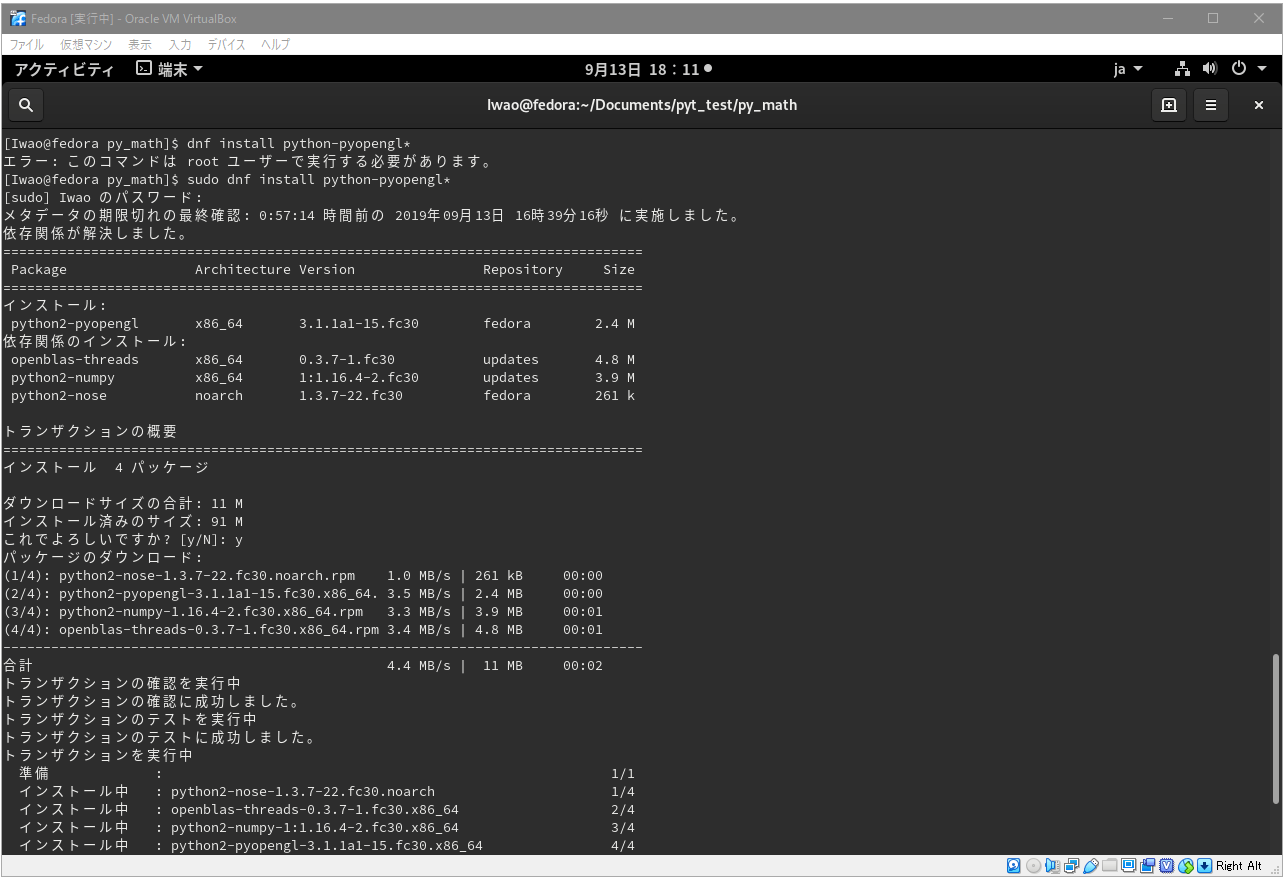
これで実行できるようになった.

2020/07/31
PyOpenGL 3.x The Python OpenGL Binding
Python のインストール状態
PyOpenGL を使えるようにしたいと思い Python のインストール状態を調べてみた.
PyOpenGL は Python 2.7 が奨励となっている?
Ubuntu

iwao@VB-Ubuntu:~$ python

Command 'python' not found, but can be installed with:

sudo apt install python3         # version 3.7.3-1, or
sudo apt install python          # version 2.7.16-1
sudo apt install python-minimal  # version 2.7.16-1

You also have python3 installed, you can run 'python3' instead.

iwao@VB-Ubuntu:~$ python3
Python 3.7.3 (default, Aug 20 2019, 17:04:43)
[GCC 8.3.0] on linux
Type "help", "copyright", "credits" or "license" for more information.
>>>
iwao@VB-Ubuntu:~$
Fedora

[Iwao@fedora ~]$ python
bash: python: コマンドが見つかりませんでした...
コマンド python' を提供するためにパッケージ 'python-unversioned-command' をインストールしますか? [N/y] n


[Iwao@fedora ~]$ python3
Python 3.7.4 (default, Jul  9 2019, 16:32:37)
[GCC 9.1.1 20190503 (Red Hat 9.1.1-1)] on linux
Type "help", "copyright", "credits" or "license" for more information.
>>>
[Iwao@fedora ~]$
Raspberry Pi

pi@raspberrypi:~ $ python
Python 2.7.13 (default, Sep 26 2018, 18:42:22)
[GCC 6.3.0 20170516] on linux2
Type "help", "copyright", "credits" or "license" for more information.
>>>
pi@raspberrypi:~ $ python3
Python 3.5.3 (default, Sep 27 2018, 17:25:39)
[GCC 6.3.0 20170516] on linux
Type "help", "copyright", "credits" or "license" for more information.
>>>
pi@raspberrypi:~ $
Win10 (VS 2017 , VS 2019)

Microsoft Windows [Version 10.0.18362.356]
(c) 2019 Microsoft Corporation. All rights reserved.

C:\Users\Iwao>py
Python 3.7.3 (v3.7.3:ef4ec6ed12, Mar 25 2019, 22:22:05) [MSC v.1916 64 bit (AMD64)] on win32
Type "help", "copyright", "credits" or "license" for more information.
>>> ^Z


C:\Users\Iwao>where py
C:\Windows\py.exe

C:\Users\Iwao>

VS 2013 以降の「新規プロジェクト」で「Python」がある.

g++ インクルードパスの設定
先日,Windows 環境に mount することで C++ の共通のコードを参照できる様になった.
今度は,これらを使用してコンパイルできるようにするための設定.
g++ file.cpp -I/mnt/_.src/__CPR_ などと指定すれば可能だが,これらのパスを 環境変数 に登録.
[Iwao@fedora first]$ g++ T_P_ini.cpp -I/mnt/_.src/__CPR_ -I/mnt/_.src/__Iwao -I/mnt/_.src/__Mlt_ -I/mnt/_.src/_gcc -Wall
In file included from /mnt/_.src/__Iwao/delff_e.hxx:14,
                 from /mnt/_.src/__CPR_/filefnc.hxx:13,
                 from /mnt/_.src/__CPR_/i_Trace.hxx:16,
                 from T_P_ini.cpp:5:
/mnt/_.src/__Iwao/enumfile.hxx:33:56: 備考: #pragma message: EnumFile.hxx MessageBar  No Support
   33 | #pragma  message ("EnumFile.hxx MessageBar  No Support")
      |                                                        ^
[Iwao@fedora first]$ ./a.out
Iwao
Iwao
[Iwao@fedora first]$

[Iwao@fedora first]$ export CPATH=/mnt/_.src/__CPR_:/mnt/_.src/__Iwao:/mnt/_.src/__Mlt_:/mnt/_.src/_gcc
[Iwao@fedora first]$ g++ T_P_ini.cpp -Wall
In file included from /mnt/_.src/__Iwao/delff_e.hxx:14,
                 from /mnt/_.src/__CPR_/filefnc.hxx:13,
                 from /mnt/_.src/__CPR_/i_Trace.hxx:16,
                 from T_P_ini.cpp:5:
/mnt/_.src/__Iwao/enumfile.hxx:33:56: 備考: #pragma message: EnumFile.hxx MessageBar  No Support
   33 | #pragma  message ("EnumFile.hxx MessageBar  No Support")
      |                                                        ^
[Iwao@fedora first]$

export の部分を sh ファイルに
[Iwao@fedora first]$ cat set_z_inc.sh
#!/bin/bash
export	CPATH=/mnt/_.src/__CPR_
export	CPATH=$CPATH:/mnt/_.src/__Iwao
export	CPATH=$CPATH:/mnt/_.src/__Mlt_
export	CPATH=$CPATH:/mnt/_.src/_gcc
export	CPATH=$CPATH:/mnt/_.src/Test

[Iwao@fedora first]$ source ./set_z_inc.sh
: コマンドが見つかりませんでした...
[Iwao@fedora first]$
登録内容を見てみると何かおかしい.
[Iwao@fedora first]$ export
declare -x BASH_ENV="/usr/share/Modules/init/bash"
declare -x COLORTERM="truecolor"
"/mnt/_.src/Testt_/mnt/_.src/__CPR_
declare -x DBUS_SESSION_BUS_ADDRESS="unix:path=/run/user/1000/bus"
...
原因は改行コード.CRLF になっていたので LF に.

本当はもっと良い方法があるとは思うが,まだそこまで理解できていない.


ここまでで何とか思ったことまでは可能.
5 年前に GLUT を調べた 時のコードを,最近のコードで動作するように少し編集.

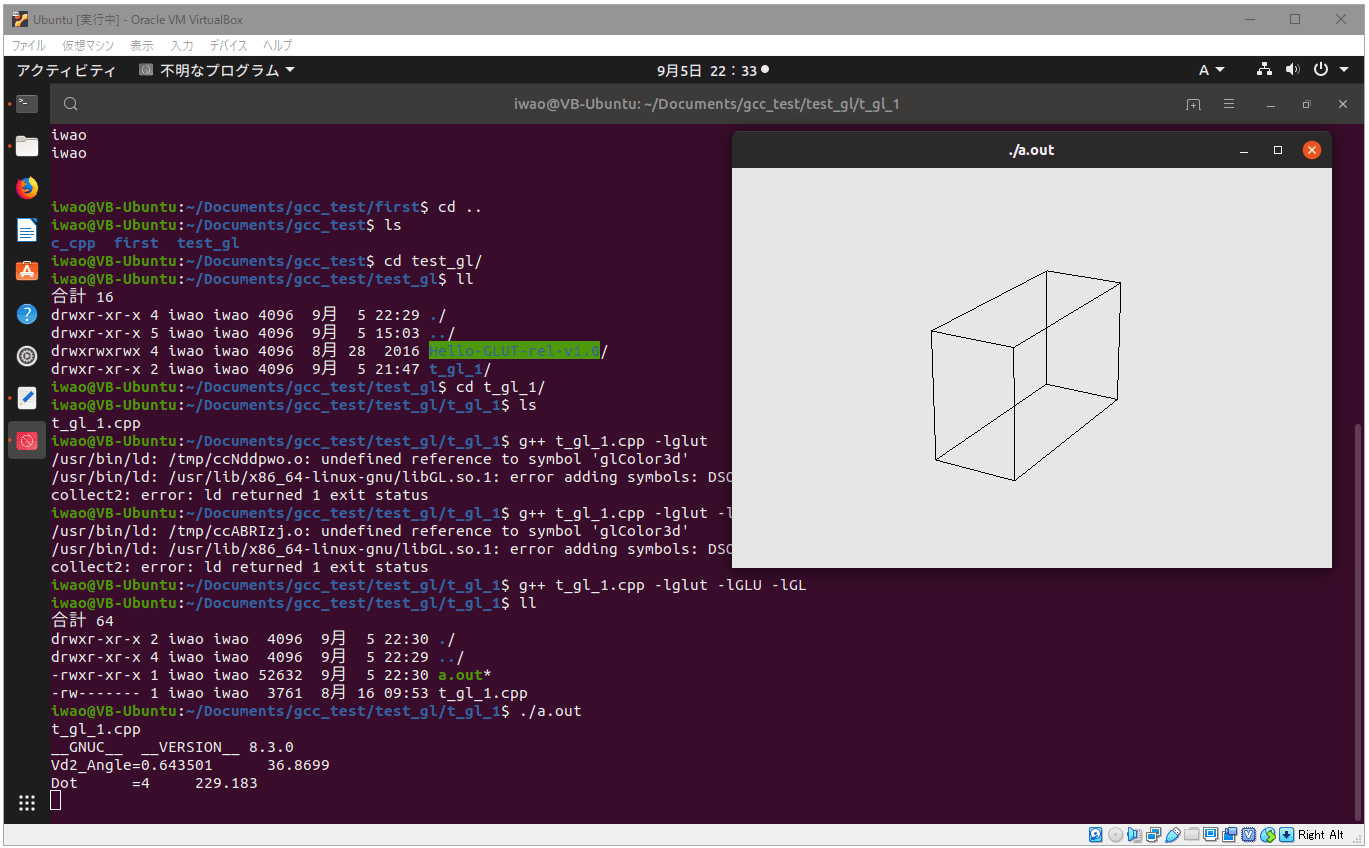
こちらは当時のコードそのまま.Pick07.cpp

FBX SDK の lib ファイル指定
先日,時間があまりとれず 今までの lib の指定 でそのままだった.
FbxSdk.h から順にたどっていくと fbxsdk_version.h があった.
この中に次の様な SDK バージョンが定義されている.
#define FBXSDK_VERSION_MAJOR	2014
#define FBXSDK_VERSION_MINOR	1
#define FBXSDK_VERSION_POINT	0
バージョン文字列は次の様に利用できる.
CString	fsv_str = FS_Ver_Str ;
#ifdef	FBXSDK_VERSION_STRING
//	fsv_str = ::To_tstring(FBXSDK_VERSION_STRING).c_str() ;
	fsv_str =           _T(FBXSDK_VERSION_STRING) ;
#endif
これらを利用した方法で書き換え.
#if		(FBXSDK_VERSION_MAJOR >= 2014)
		#define	FS_VER_GT_2014_00
#endif
#if		(FBXSDK_VERSION_MAJOR >= 2019)
	#if	(FBXSDK_VERSION_MINOR >=    1)
		#define	FS_VER_GT_2019_01
	#endif
#endif

#ifdef	FS_VER_GT_2019_01
	#ifdef	_DLL
		#pragma	comment	(lib, 	"LibXml2-MD.lib")
		#pragma	comment	(lib, 	"Zlib-MD.lib")
	#else
		#pragma	comment	(lib, 	"LibXml2-MT.lib")
		#pragma	comment	(lib, 	"Zlib-MT.lib")
	#endif
#endif

#ifdef	FS_VER_GT_2014_00
	#ifdef	_DLL
		#pragma	comment	(lib, 	"LibFbxSDK-MD.lib")
	#else
		#pragma	comment	(lib, 	"LibFbxSDK-MT.lib")
	#endif
#endif

https://dev.mish.work/wordpress/2020/12/15/fbx-sdk-hxx-pragma-comment/
コンパイルオプション -Dname=…
コンパイル時のオプションで -DVER=2019.09 の様な指定を使いたくなったので調べてみた.
コードは次のようなもの.
#include	<iostream>
#include	<iomanip>

#ifndef	Test_Ver_F
#define	Test_Ver_F  2019.0902
#endif

int	main	(int argc,   char* argv[])
{
	{
		std::cout                            	<< Test_Ver_F  << std::endl ;
		std::cout <<  std::setprecision(20)  	<< Test_Ver_F  << std::endl ;
		}
	return	0 ;
	}
pi@raspberrypi:~/Documents/test_gcc/t_ccsw_d $ g++ t_ccsw_d.cpp
pi@raspberrypi:~/Documents/test_gcc/t_ccsw_d $ ./a.out
2019.09
2019.0902000000000953
pi@raspberrypi:~/Documents/test_gcc/t_ccsw_d $ g++ t_ccsw_d.cpp -DTest_Ver_F=2019.0902
pi@raspberrypi:~/Documents/test_gcc/t_ccsw_d $ ./a.out
2019.09
2019.0902000000000953
pi@raspberrypi:~/Documents/test_gcc/t_ccsw_d $ g++ t_ccsw_d.cpp -DTest_Ver_F="2019.0902"
pi@raspberrypi:~/Documents/test_gcc/t_ccsw_d $ ./a.out
2019.09
2019.0902000000000953
pi@raspberrypi:~/Documents/test_gcc/t_ccsw_d $ g++ t_ccsw_d.cpp -DTest_Ver_F=\"2019.0902\"
pi@raspberrypi:~/Documents/test_gcc/t_ccsw_d $ ./a.out
2019.0902
2019.0902
pi@raspberrypi:~/Documents/test_gcc/t_ccsw_d $ g++ t_ccsw_d.cpp -DTest_Ver_F=\"2019.09.02\"
pi@raspberrypi:~/Documents/test_gcc/t_ccsw_d $ ./a.out
2019.09.02
2019.09.02
pi@raspberrypi:~/Documents/test_gcc/t_ccsw_d $
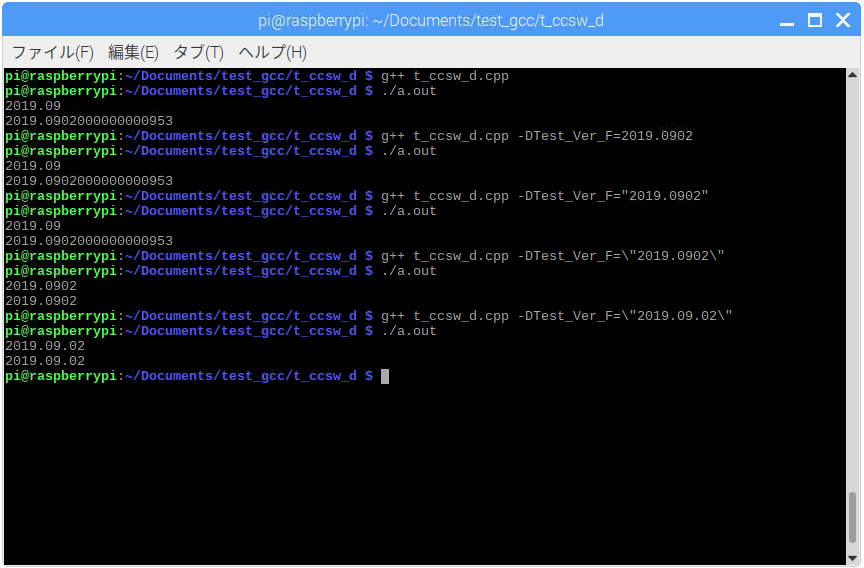
2019.0902 の様な浮動小数点の指定は特に変わった所はない.
但し浮動小数点による誤差などは考慮が必要.
文字列として扱いたいときは \” で括ればよい.